Nature's Critters Maker Box
The Dainty Maker Box No. 9 is a mixed-media wooden wall hanging mobile. We are so happy to welcome spring and this special box is a testament to that! I love experiencing the change of seasons and spring is no exception. Patiently awaiting the blooming of all of our favorite flowers, watching the bees and butterflies flutter around busier than ever, and waking up to the sweet sound of birds adds a little extra joy to our days. I’m excited for each of you to make it your own!
Whether you or your littles are neutral lovers, or the "color all the way" type, there is something for everyone with this maker box.
These maker boxes are made to be done together, to encourage quality time, that's why I don’t put an age limit on these projects. Depending on how old your child is, you may need to tweak the steps slightly in order to make it fun for everyone.
This keepsake is meant to be kept for a lifetime. I especially love pulling out previous holiday crafts my girls make to put out each year, so we used two types of glue to help make that possible. My girls each use a low temp glue gun, which is warm, but not hot. (Here's the link to the glue gun.) We also used a tacky glue for some parts, which is best for use on fabrics. (This kind.)
*These glues can also be found at any craft store and are used for just about every maker box.
1. Lay out all materials/supplies.

2. First, let’s create the antennae for the bee and the butterfly. Locate one flat-bottom clothes pin (BEE), the round-bottom clothes pin (BUTTERFLY), the two pieces of black wire, and four of the small black beads.
3. Wrap black wire 2 or 3 times around the silver eyelet on the head of each of the clothes pins. Bend into shape.

4. Add a black bead at the tip of each antennae . Pinch closed to secure it in place. Repeat for the second clothes pin.

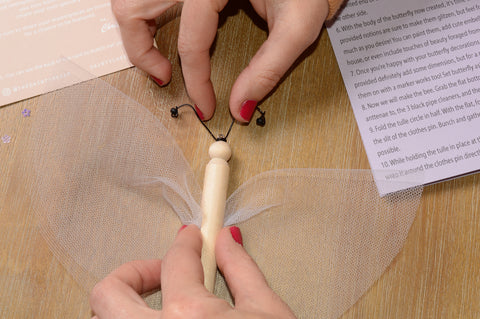
5. Now we will start to make the butterfly. Grab the rounded bottom clothes pin and the four wooden teardrop pieces. Add hot glue to one side of the slit in the clothes pin. Press the pointed end of two of the teardrop shapes into the slit to create the wing. Repeat for the other side.


6. With the body of the butterfly now created, it’s time to decorate the wings. The provided notions are sure to make them glisten, but feel free to customize the wings as much as you desire! You can paint them, add cute embellishments found around the house, or even include touches of beauty foraged from nature.


7. Once you’re happy with your butterfly decorations it’s time to add the eyes. The beads provided definitely add some dimension, but for a more simplified approach drawing them on with a marker works too! Set butterfly aside.

8. Now we will make the bee. Grab the flat bottom clothes pin that you added the antennae to, the 3 black pipe cleaners, and the tulle fabric circle.
9. Fold the tulle circle in half. With the flat, folded end facing up slide the tulle through the slit of the clothes pin. Bunch and gather the tulle; making sure to slide it up as far as possible.

10. While holding the tulle in place at the top of the slit, take a black pipe cleaner and wrap it around the clothes pin directly beneath the tulle. This will hold it in place.

11. Add the other 2 black pipe cleaners above and below the center one. These will be the bumblebee’s stripes. Trim tulle to desired shape.


12. Add the eyes using the black beads or a marker.

13. Feel free to add any leftover rhinestones or sequins to the bee’s wings to add some pizzazz. Set bee aside.
14. Now it’s time to make the bird. Take the unused flat-bottom clothes pin and glue the pair of matching feathers to either side. These are the wings.


15. To create the tail feather, glue the remaining feather in the opening at the bottom of the clothespin.

16. Glue the two cylinder glass beads to the middle of the face to form the beak.

17. Add the eyes using the color bead of your choice or a marker. Your bird is now complete!

18. Set your critters aside while we create the hanging dowel. Locate the wooden dowel and one of the pieces of twine. Wrap and knot each end of the twine to each end of the dowel (leaving about a half inch on each end). Glue down or trim excess.


19. Take the other three pieces of twine and double-knot one end on each of them. Cut off the excess after the knot.


20. Thread the unknotted end through the back of the eyelet on each of the critters.


21. Wrap and knot each twine onto the wooden dowel leaving equal distance between each critter. Stagger the height and be sure to put butterfly in center to balance the weight.


22. You're all done!


Leave a comment