
Box No. 10 is a Dainty twist on a classic craft. These rice sock pals are a joy to bring to life and once you make one, you’ll want to make more because they are so fun to create. We had a lot of fun making ours!
These maker boxes are made to be done together, to encourage quality time, that's why I don’t put an age limit on these projects. Depending on how old your child is, you may need to tweak the steps slightly in order to make it fun for everyone.
This keepsake is meant to be kept for a lifetime. I especially love pulling out the previous holiday crafts my girls have made to put on display each year; so we used two types of glue to help make that possible. My girls each use a low temp glue gun, which is warm, but not hot. (Here's the link to the glue gun.) We also used a tacky glue for some parts, which is best for use on fabrics. (This kind.)
*These glues can also be found at any craft store and are used for just about every maker box.
1. Lay out all materials/supplies.

2. Cut sock approximately 4 inches below the heel. Set toe section aside.


3. Flip the sock inside out.

4. Gather and tie the cut end of the sock 3/4 inch from the top.

5. Tie tightly with black embroidery floss. Be sure to knot 2 or 3 times to secure. This will become the bottom of your pumpkin. Trim excess embroidery floss.

6. Flip sock back to correct side out.

7. Slowly scoop or pour 1 1/2 - 2 cups of dry rice or oatmeal into your sock. (You can place sock in tall drinking glass and fold ends over the lip to support the sock as you pour.)

8. Once sock is filled to the dark orange rib section, use the rest of the black embroidery floss to tie off the top section of the sock. Use the same method as Step 5.
[*Note: my daughter wanted to fill hers a little more (as shown) so the darker color will show more on the pumpkin itself the more you fill it.]
[*Note: my daughter wanted to fill hers a little more (as shown) so the darker color will show more on the pumpkin itself the more you fill it.]

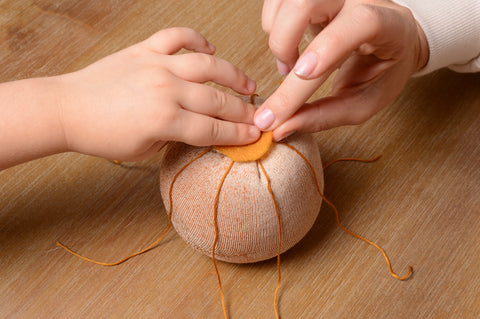
9. Now let’s make the rib detail of the pumpkin! Locate the golden embroidery floss, the mustard felt, and 1 rubber band. Cut a quarter-sized circle out of the mustard felt and set aside. Next, fold the embroidery floss in half. Find the center and make a cut. Fold the 2 pieces you made in half again. Find the center and make another cut. You now have 4 pieces of embroidery floss.


10. Flip pumpkin upside down. Criss-cross the 4 pieces of embroidery floss across the center of the base of the pumpkin. Make sure each piece of embroidery floss is centered on the bottom. Once they are positioned equidistant from eachother, take the quarter- sized felt circle and hot glue it directly to the center of the pumpkin base to secure the embroidery floss in place. Allow to dry.


11. Flip pumpkin back over and add hot glue in the folds of the dark orange rib section. Pinch to shape stem as desired. Allow to dry.


12. Next, straighten each piece of embroidery floss underneath the pumpkin. Wrap the rubber band twice around the stem of the pumpkin. One-by-one, pull the embroidery floss up and under the rubber band to create the ribs. Feel free to add a dot of glue on each piece to hold it in place. Trim excess embroidery floss.


13. Now we’ll make the face! Included is a pattern for an example face, however, there are plenty of supplies to get creative! Hot glue your selected facial features directly to your pumpkin’s face. If you choose to use the included pattern: Cut the pattern out of cardstock. Trace pattern on black felt (a white crayon or white colored pencil works best.) Cut face out of felt. Add pink pom poms to make the cheeks. Glue each piece onto the front of the pumpkin.


14. Next let’s add the leaves! Put a line of hot glue on each leaf and sprinkle sequins on top to add some glitz. Allow to dry. Once glue has set, add some glue to the end of the leaves and press and hold into desired position.


15. Lastly, you can finish your pumpkin off by tying tulle ribbon around the stem to make a bow. Trim excess.


16. You can also accessorize your new pumpkin using anything around the house that may be fitting!


Leave a comment